Let’s Build an E-Commerce App Frontend with Vue.js

After building the admin panel, now we are going to show products to customers.
 on [Unsplash](https://unsplash.com?utm_source=medium&utm_medium=referral)](https://cdn-images-1.medium.com/max/5356/0*jt2qtxp-Q-yg5D5h)
Table of Contents
Introduction
Front-end frameworks
Vue.js
Our E-Commerce application
Related articles
Resources
Introduction
We are building an E-Commerce application from scratch. We have a series of tutorials explaining the different aspects of it, from backend API to front end design for Android and Web.
The focus of this tutorial will be on Vue.js, a popular JavaScript-based front end framework. I will be sharing my knowledge on topics like what is Vue.js and what Vue.js has to offer. Then we will see how we can fit all the different pieces of Vue to create a robust front end for our application.
Demo
Webtutsplus E-Commerce App Edit descriptionremotedevs.org
Have a look at the above link to check out the working of our application. All our feature updates and modifications will be reflected here.
Front end Frameworks
A front-end framework in simple terms acts as an intermediate between us and the DOM. Using front end frameworks, we no longer need to use the features provided by our browser to manipulate the DOM and its elements.
Using these frameworks we only have to manage our application’s data and its flow, the changes to the DOM are handled automatically. Front end frameworks like React, Angular and Vue provides us with different wrappers over the traditional way of interacting with the DOM.
These frameworks provide us with a scaffold, on top of which we write our code. In doing so, we have to follow the basic pattern and the structure provided by these frameworks.
Why do we need frameworks?
Browsers have become very powerful in recent times. As new features are being added to them, the line separating web apps and native applications has started diminishing. Designing a more complex application requires more abstraction from the low-level tasks.
This is where developers came up with the idea of front end frameworks. These frameworks make our codebase more scalable and manageable. In short, front end frameworks gives us a new and easier way to decorate the DOM.
Vue.js
Vue.js is a lightweight, yet powerful JavaScript front-end framework. Vue has been continuously gaining popularity since its first release. The recent updates introduced in Vue 3 have made it more popular among developers.
All frontend frameworks solve the same problem, hence most of them follow the same approach. But many developers consider Vue as the best of both worlds - React and Angular. Vue, alike other frameworks, provides us with many features.
First, we will create the Homepage for Customers for our E-Commerce App, then we will deep dive into some of the features of Vue.js
Homepage of E-Commerce Application
Now after an overview of Vue.js, let’s think of creating a front end for displaying products and categories of our application. What all features of Vue we might need?
Fetching the data
The very first requirement of our application is the product and categories’ data. Every Vue application has a root component which is the first to be mounted to the DOM. The Vue CLI names this component as App.vue. It is beneficial to fetch our data in the mounted lifecycle hook of this component because once we have the required data in our App component, we can pass this data to all other components as props. I have used the Fetch API to request data from our backend API.
Setting up the router
As mentioned earlier, the Vue router enables us to link browser URL with components. This means if we go to some specific URL defined earlier, we can render a specific component based on that URL. For setting up all these routes, the Vue CLI provides index.js file. In this file, we have to define all the routes with the URL path, its name, and the component to be rendered.
Let us start by designing the front end for displaying products. A similar process goes for categories. So these are the routes related to products which I have created.
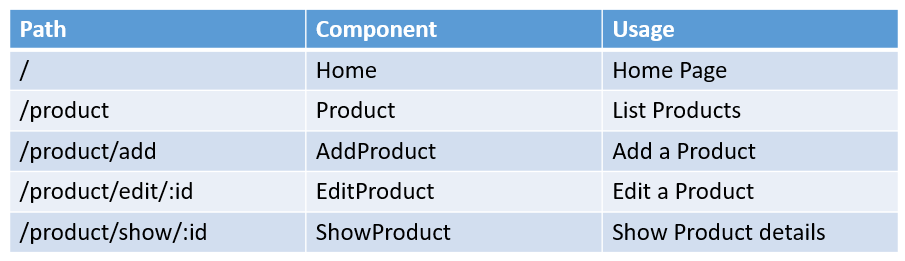
All the components which get coupled with some routes are known as router views. The Vue router provides a router-view tag which is used to dynamically render components based on the URL. The props to be sent to the router views also need to be mentioned here. The router-view tag just replaces a call to the child component based on the URL path. This is the same as using a component inside of another component.
Home Component
The Home component gets rendered on the landing page of our web app. But as said earlier, the App.vue is the first component to get rendered, then why do we get to the Home page? This is because throughout the usage of our application the App component is always active. All other router views just get rendered inside of it. That's why the App.vue component is known as the root component.
So on the Home component, we provide our users with all the different links to important pages. I have just provided a button Start Shopping that leads to the product page. The Navbar at the top is a fully reusable component that is placed before router-view in the App component. Thus, it will be visible at the top irrespective of the URL path.
 on [Unsplash](https://unsplash.com/s/photos/toys?utm_source=unsplash&utm_medium=referral&utm_content=creditCopyText)](https://cdn-images-1.medium.com/max/3792/1*bUZ0pMjMEs8o5vhSAnZ0Aw.png) Background photo by Susan Holt Simpson on Unsplash
Background photo by Susan Holt Simpson on Unsplash
Product Component
The Start Shopping button on the Home component and the Product link on Navbar leads to the Product route. It lists all the products present at our warehouse, ready to be dispatched. Along with this, it provides a button to AddProduct route.
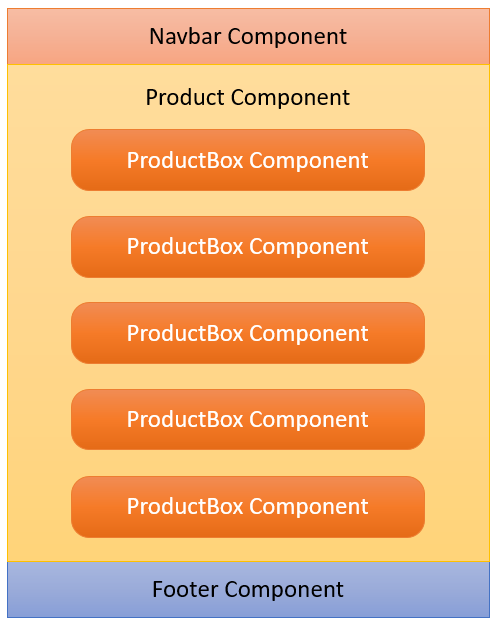
Now the list of products may contain hundreds of items. All the products will have a common layout and will display the same properties. So we can make use of a component which will be reused for all the products.
Let us name this component ProductBox, we will get to its details very soon. But how do we loop through all the products? Remember we have all the products(an array) available to us as props sent by the root component.
Now to loop through the products we make use of the v-for directive. v-for is a for-loop command provided by Vue. For every product, we render the ProductBox component passing the product object as a prop. This way, all the products get displayed one after the other.

ProductBox Component
The ProductBox component will be displaying product details which in our case includes name, description, price and imageURL. For every product of our application, the ProductBox component will be rendered with dynamic data.
We also have an Edit button to update the product details. In later tutorials, we will hide this option and reserve it only for admin usage. This Edit button leads us to the EditProduct component.
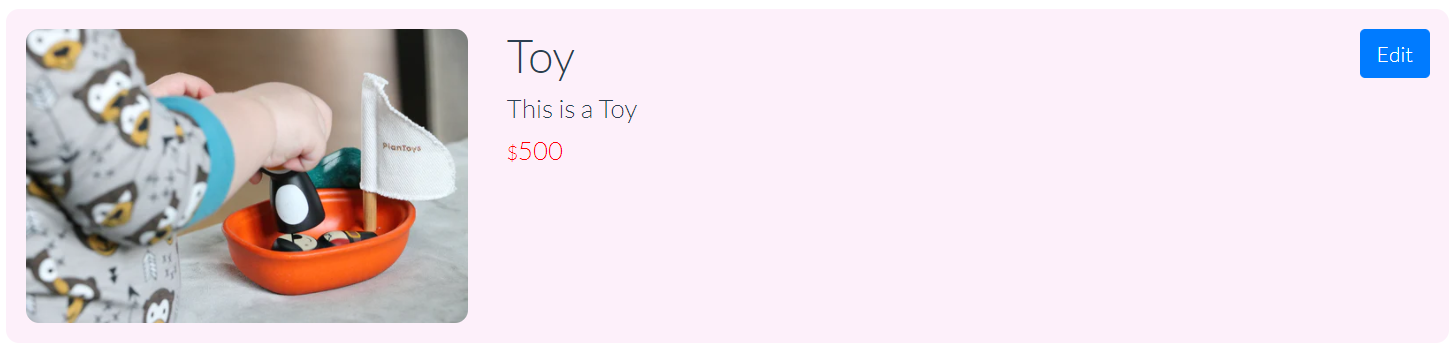
 Product display page
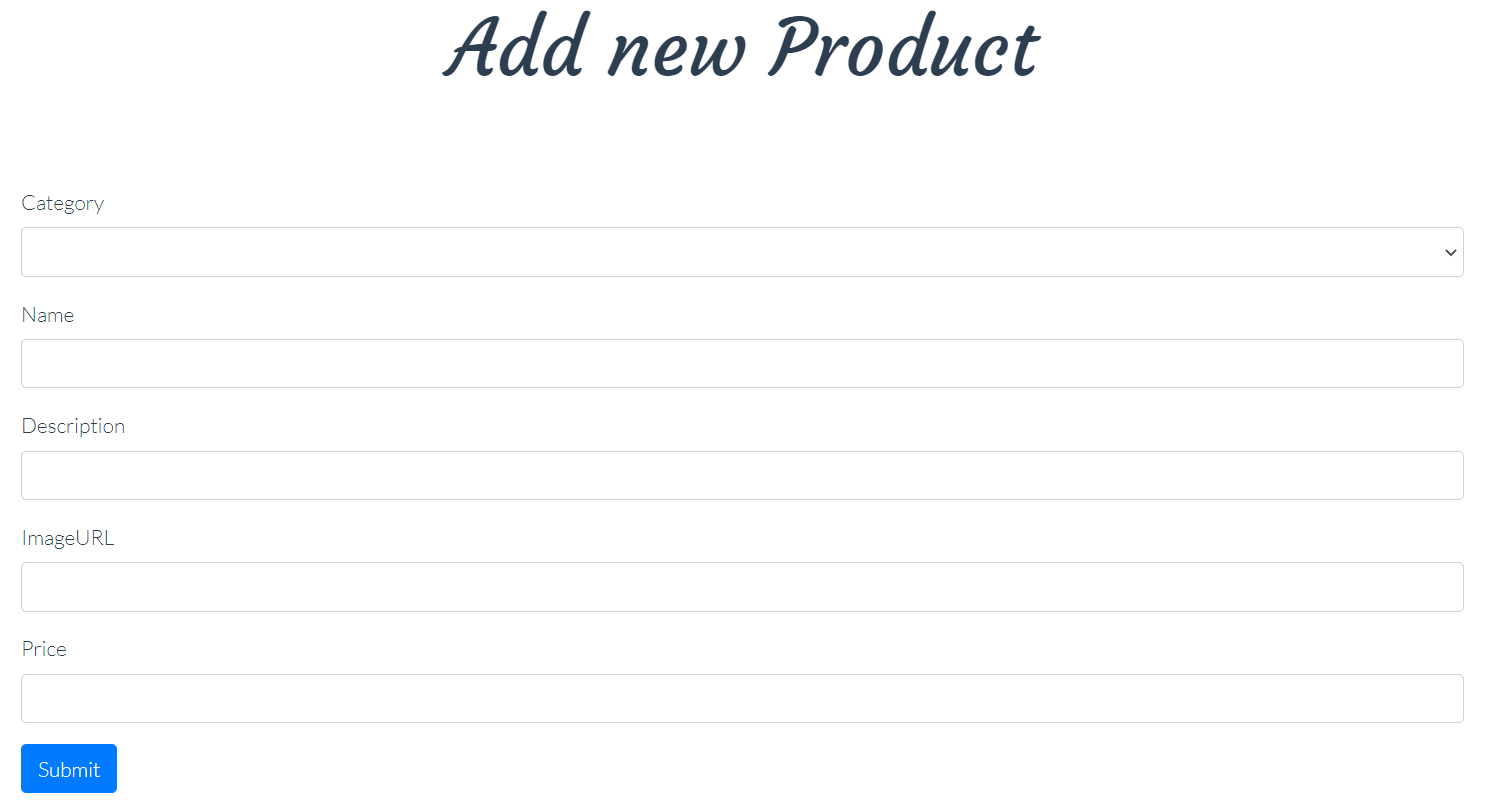
AddProduct Component
This component renders a form for adding a new product to our application database. Similar to edit functionality, this will also be admin exclusive. In the form, we will use the v-model directive to establish a two way binding between user input and our component data fields.
This way we track the product details mentioned by the user. We also attach a click event to the form submit button. The click event triggers a call to a method which adds the product to our products list. Behind the scenes, the method makes a POST request to the backend API. Here also, I used the Fetch API to make this request.
EditProduct Component
This component renders a form to update the details of an existing product. To uniquely identify the product, the path of this route contains a parameter id. Whenever we press the edit button for some product, redirect to the edit page takes along with itself the product id as a route parameter.
This way we can access the product and fill the form with the current details at the beginning. Similar to the AddProduct component, we attach a click event to the submit button. Then, the invoked method sends a request to the backend API to update the product identified by its unique id.

ShowProduct Component
Now we also need to provide the user with options to see more product features, add it to the cart, proceed with purchasing the product, see similar products, and much more. For this, we need a dedicated page for all the products.
The ShowProduct component solves this problem. This route also has the product id as the route parameter. In the ProductBox component, I have attached click event listeners on the product image and name. These events once triggered redirects us to this ShowDetails route.
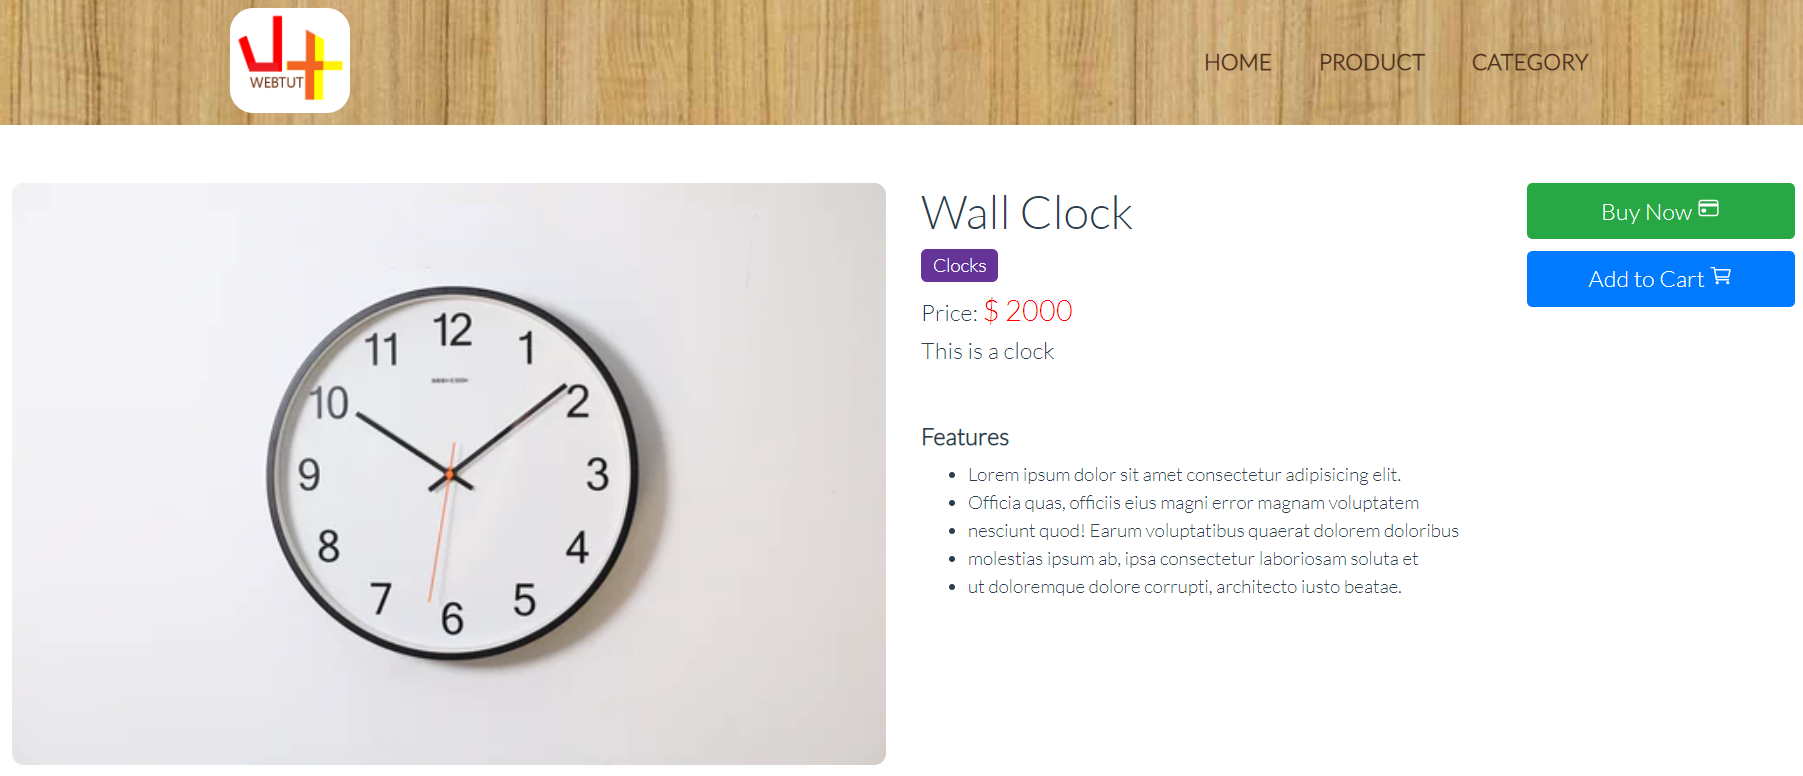
The Buy Now and Add to Cart functionalities are not yet working, but stay tuned, we will be adding these functionalities and a lot more very soon. Our upcoming tutorials will focus on authentication, a shopping cart, and a complete checkout process that you experience on popular E-Commerce websites.😉
For people, who want to deep dive into Vue.js and learn more about it, keep reading.
Deep Dive With Vue.js
Virtual DOM
Virtual DOM refers to a replica of the original DOM. A virtual DOM is used to reduce frequent manipulation of the actual DOM. When our application demands some changes, these are first made to the virtual DOM. These changes are then compared with the original, and only the final updates are done to the real DOM.
Now, this may sound weird, but in fact, this improves the efficiency and speed of our application. The whole idea is based on the fact that the real DOM, which paints our webpage takes relatively more time to get updated, hence virtual DOM optimizes this process.
Vue CLI
The Vue command line interface helps us to smoothly work on our project. We can add our preferences and requirements using the Vue CLI tool. A new Vue project created using the Vue CLI makes our task very easy. It provides us with a simple Vue project scaffold. It saves our time by filling in the usual code required for a basic project.
Components
There are many parts of our application that are used at multiple places, sometimes we have to unwillingly repeat the same code to get proper functionality. Vue solves this problem by using components. In Vue, files with “.vue” extension are known as single file components.
These components house their HTML, CSS, and JavaScript. These components can be used independently at multiple places with dynamic data. Some common situations where we can use components include search bars, registration forms, product display cards etc.
Directives
Directives are the Vue commands which we use in the template of our components for performing several actions. These include v-on, v-show, v-model, v-bind, v-if, v-for and many more for different situations.
Data Binding
The directives v-bind and v-model can be used to establish a data binding between a component’s template elements and data fields. v-bind is used for data flow from JavaScript to HTML, and v-model for vice-versa.
Event Handling
The directive **v-on is used to attach event listeners to HTML elements. On the occurrence of an event, we can either execute some logic inline or make a function call. Using vanilla JavaScript, we would have to first select the element using the methods provided by the browser and then attach event listeners to it. The `v-on`** directive makes the task a lot easier.
Props
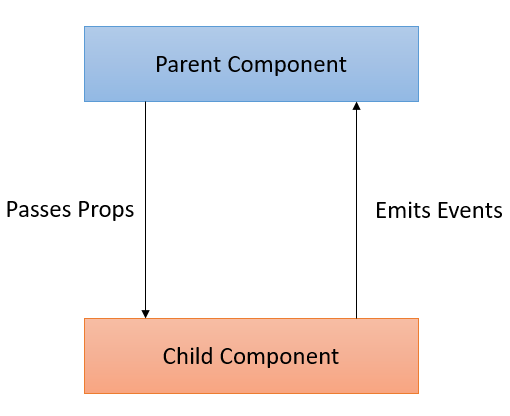
Vue components can be used in multiple places. We can also use a Vue component inside of some other component. In this situation, they are known as child and parent components respectively. The parent to child communication is done using [**props](https://v3.vuejs.org/guide/component-props.html#prop-types)**. The parent component can send data to its child component. This data is known as props. In practice, we use these props to enable the child component to render dynamic data.
But how can a child communicate back to its parent? Vue components have the capability to trigger **custom events. These events just like the other ones can be listened to using the v-on directive. A child component can emit an event **to make the parent component handle it. In emitting this event, the child component can also pass arguments to its parent.
Lifecycle Hooks
Every Vue component goes through different processes in its lifecycle. This includes the creation of a component, the first time it is mounted to the DOM, and the time it gets destroyed. Vue provides us with the capability to write code that gets executed automatically whenever some component goes through these processes. We have to use methods like created(), mounted(), and destroyed() to define logic inside a component’s instance object. These methods are known as Lifecycle Hooks. This image from the Vue documentation explains all these lifecycle hooks very well. Have a look!
Router
The Vue router enables us to link our browser URL and our components. This helps us define paths that get coupled with our components. This way Vue renders components based on the URL. The official page of Vue router lists all its features. The most important of all these is the ease of creating **Single page applications (SPAs) **using Vue router.
Related Articles
This tutorial was intended to give you an overview of what Vue.js is and how we can use a front end framework to design beautiful applications. If you are curious about the implementation details, check out the following articles. Let’s Create A Vue.js E-Commerce App We will be creating a Vue.js application for displaying our Products and Categories.medium.com Let’s develop an Ecommerce Application from Scratch using Java and Spring We are going to build an e-commerce application from scratch using Java, Spring backend, build web UI in Vue.js, and…medium.com
Resources
Vue.js 3: official documentation for Vue 3
Frontend code: bitbucket link to the front end codebase
Backend API Repository: bitbucket link to the backend API codebase
Swagger-UI for the API: visualize the API here